How do I ride dunes?
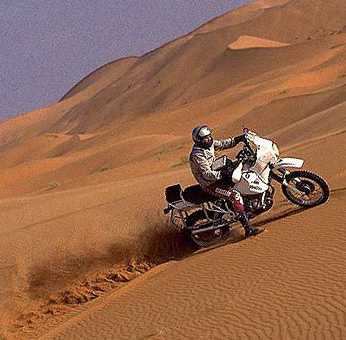
Basically everything I just said about riding in sand is a prerequisite. Anyone wanting to ride the highest dune crests has the best chance with a very powerful, light sport enduro. Some dunes are not suitable for dune riding — or only poorly so — because of their rough internal structure (e.g. Erg Chebbi in Morocco); others are much larger and smoother (e.g. in Algeria and Libya) and therefore easier to ride. The technique is as follows: inspect the terrain in the dune valley and ride around a little. Find a straight line to the dune crest — there must be no desert grass clumps, edges, humps or anything similar in the way. Accelerate first to a moderate speed of about 80 km/h, then as it gets steeper ride at full throttle; when the revs drop, change down quickly, and so on. Before you become too slow, sweep a long arc in the wall into a "steeply banked curve" and ride back down. Try not to stop in the wall, as recovering the motorcycle is often exhausting. With each attempt widen the "U" until you get a feel for how high you can get with a given amount of throttle and momentum. Then you can try, at a dune crest that is not too "sharp-edged", to make a targeted stop with the front wheel already on the "other side". Then try to push through and ride down. Caution: come in too fast and you will fly off — potentially fatal! When descending, give a little throttle and ride down in 2nd or 3rd gear. Do not brake at the front — risk of somersaulting! This all sounds rather dramatic, but anyone with good feel who slowly works up to it as part of a team will manage. My highest dune is in Erg Tiodaine (Algeria) and was a measured 330 metres (I have a horrible Casio altimeter watch with which I can determine this to within 5 metres!). The run-up was 2 km, full throttle at 140 km/h on my TT600! Watch out — some walls are so steep that the machine wheelies in 2nd gear even with the body leaning as far forward over the handlebars as possible! I have climbed high dunes with a pillion too (though a pillion that brave is the exception!). Photo: enjoyable riding in Erg Chebbi, Morocco, 1995.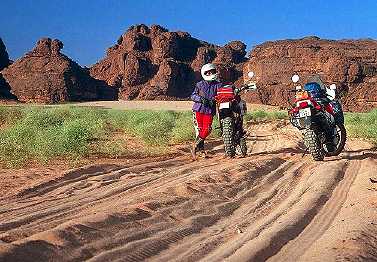
How do I ride sandy ruts?
Sandy ruts are particularly unpopular with beginners because the chassis "stirs" so much. Smaller ruts you cross at a not too acute angle, or fast enough that only the rear end sways slightly. The swaying is something you consciously ignore and get used to. Good protective clothing — especially good boots, but also a cross armour vest — gives you the courage to keep the throttle open. Very deep ruts that you have to follow because you cannot avoid them, ride at sufficient speed and above all with a good "line" — see above. It can help beginners to imagine they have to ride a very gentle wavy line in the centre of the rut. Do not "fidget"! That is dangerous. You start to wobble and lose energy (because you make no progress and it is extremely tiring). The bike does what it wants because you can no longer "guide" it through the footrests. With a pillion and luggage, riding deep sandy ruts (a good 50 cm deep!) is especially hard — as I was reminded in Australia with poor tyres. Photo: Algeria, light sandy track, Fadnoun plateau.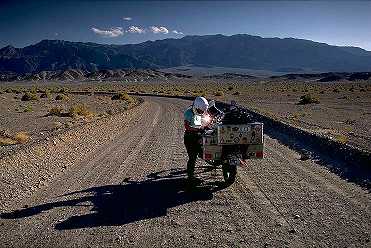
How do I ride corrugated (washboard) tracks?
Books contain all sorts of dramatic stories about corrugated tracks. All I can say is: for motorcyclists corrugated track is much less of a problem than for car drivers. Cars can either go very slowly over the corrugations, or fast enough (usually 80 km/h and more) that the wheels no longer follow the waves and the engine-destroying rattling at intermediate speeds stops. Modern enduro suspension filters out most of the vibration, and the little rattling that remains is bearable (secure luggage and number plate well!). With a modern enduro you can ride normal corrugations at virtually any speed. Rare is a "long-wave" type of corrugation where the waves follow at 0.5 to 1 metre intervals and are up to 30 cm high. Anyone going too fast loses all grip and can neither quickly correct course nor brake. This kind of corrugation is said to be created by multi-axle lorries and then shaped by the wind. You can usually move to the edge of the track. Photo: simple corrugated track in Death Valley, USA, 1989. Temperature was around 50°C!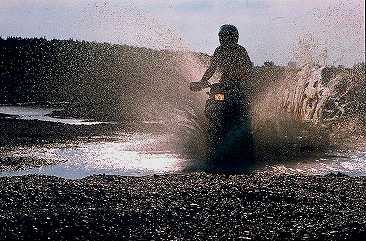
What should I consider for river crossings?
Up to 20 cm depth: nothing. A test for waterproof boots. Deeper crossings: the first critical point is the engine — if it is overheated, the casing can crack. Remedy: let it cool down a little, splash water on it by hand. The second critical point is the air intake — if this goes underwater, the engine stops immediately. If this does not happen at high revs, no damage occurs (known as hydraulic lock). Reviving the engine can be laborious since the air filter must be removed, spark plugs dried, etc. If the river (like the tide-dependent Bloofield River in Australia when I was there) is too deep for the air intake, it is better from the outset to push the bike through (that 300 m-wide, over one-metre-deep river was infested with crocodiles, but we had no choice because of the incoming tide; only the handlebars were sticking out). The third point is the electrics, which should be waterproof on an enduro, but sometimes the spark-plug cap, ignition coil and cables leak — the spark then fails immediately when a lot of water arrives. Besides these technical points, one should wade through first to check the ground conditions (slippery round pebbles?) and exact depth. Do not ride too slowly — the gyroscopic forces disappear and you lose balance; additionally, "underwater grip" from the tyres is generally very poor, so you should not stop. Photo: here I am riding wet enduro on the army training range in Munich.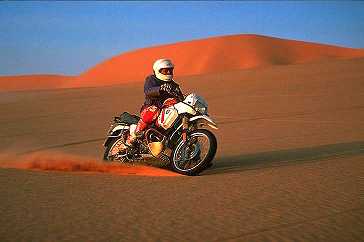
How do I do a drift?
Being able to do this is not essential but very useful. Practise (in full protective gear!) on a light, unloaded bike on as smooth, dusty or slightly sandy ground as possible. The bike will certainly slip away and fall several times, so remove the mirrors and indicators first. Ride tight circles and figures-of-eight in second gear, with one foot out touching the ground. Now give controlled light blips of throttle, steer slightly in, gain more lean angle and try to feel the rear wheel breaking away. Strictly maintain the cornering radius — do not nervously steer straight! Once you have this under control, open the throttle more firmly and let the rear come properly sideways. Always stay on the throttle. The spinning rear wheel builds up good gyroscopic forces; as long as you keep the throttle open you will not fall over! Once you have the feel for it, you will ride almost every corner with a drift more quickly and safely. Then you can try applying this technique to the loaded bike. Then on the twin-cylinder enduro. And then even with a (brave) pillion on the back! Photo: here I am riding a friend's damaged standard GS PD in the great eastern Erg. This photo is also reproduced in the recommended "Faszination BMW GS" book (STX Verlag), page 90.
How do I do a wheelie?
First of all: a real wheelie (front wheel stays up) is dangerous. A friend badly injured himself and damaged a car when he wanted to "show off" in a beer-garden car park. On a journey there is no place for this, especially not in Africa! In principle a wheelie works like this: pull in the clutch, open the throttle, release the clutch with a snap, the front wheel comes up; hanging in the footrests and on the handlebars, balance with a little throttle; stop with the rear brake. Never practise without a cross armour vest and back protector! The fastest way to learn is on a trials machine, because it is most responsive to the throttle and also much lighter and smaller than a normal enduro. Photo: on my TT in Erg Tifernine, Algeria.Questions, criticism or suggestions for additions to this page? Write to me! I can always use input. If you have an interesting FAQ, send it to me!